Identity Management - Developer guides
- Deployment scenarios
- Infrastructure supporting the access to the LEAR Credential
- Verifier integration: main OIDC endpoints
- Verifier Integration: choosing the right integration mode
- Verifier Public Client Integration: Authorization Code Flow + PKCE
- Verifier Confidential Client Integration: Authorization Code Flow + client_secret_jwt
- Verifier M2M Integration Guide
Deployment scenarios
Deployment of the LEAR Credential Issuer
The LEAR Credential Issuer is a web application consisting of a server part, HTML interface, the APIs implementing the OpenIDVCI protocol, and the APIs required by the LEAR Credential Signer program.
The LEAR Credential Issuer does not require integration with the rest of the DOME infrastructure, so it supports different deployment scenarios.
By DOME as a service
Regardless of the other scenarios, DOME provides an instance of the LEAR Credential Issuer as a service, so organisations (especially SMEs) do not have to worry about deployment.
The application is standalone and does not require interaction with any other system except a compatible the Wallet and the LEAR Credential Signer.
By an organisation willing to generate LEAR Credentials to its employees
The LEAR Credential Issuer can be deployed by any organisation wishing to control the full system. It can be deployed either on-premises or in any cloud environment that the organisation wants to use. The only requirements are that the HTML interface and APIs should be available to the involved actors in the company. They can even not be available through Internet, if the company so wishes.
The application is provided as a set of Docker containers that can be easily deployed in many environments.
By an entity willing to provide the service to third-parties
An entity willing to provide the LEAR Credential issuance service to third-parties for whatever reason, can do so by deploying the LEAR Credential Issuer on their own system.
Deployment of the LEAR Credential Signer
This is a simple program that is installed in the PC of the legal representative. It is intended for self-installation without requiring technical knowledge, though it is expected to be installed by the IT personnel taking care of the personal computer infrastructure of the employees in the organisation. The program can be installed using the typical automated installation processes in big organisations.
The only configuration required is the URL of the LEAR Credential Issuer that the organisation wants to use for Credential issuance. It may be the URL of the instance operated by DOME, or any other instance that the organisation wants.
Infrastructure supporting the access to the LEAR Credential
This section describes the components and infrastructure required by an organisation to create the LEAR Credential for one of its employees.
LEAR Credential Issuer
Description
The LEAR Credential Issuer is the main application that manages the credential flow. We assume here that it is specialised in creating LEAR Credentials, though it could be used for other types of credentials. In this context, we will use the term LEAR Credential Issuer and Credential Issuer as interchangeable.
For the explanation, we are going to assume the issuance flow described above and a given set of actors. However, the flows can be adapted to other scenarios.
The main actors are:
- Appointed employee
- This is the employee that will receive the LEAR Credential and that has been nominated or appointed by the organisation to perform some role in DOME on behalf of the organisation.
- HR employee
- The employee from the Human Resources department of the organisation that introduces the Appointed employee data in the Credential Issuer application.
- Legal Representative
- The natural person that is the official legal representative of the organisation.
Obtaining an eIDAS certificate
Before starting the process, the legal representative should have an eIDAS certificate. This is the same certificate that can be used to sign documents in PDF form. The legal representative will be signing the LEAR Credential in a similar way to signing a PDF in her machine, except she will use a special program provided by DOME instead of Acrobat Reader. The technical requirements for signing LEAR Credentials are essentially the same as for signing a PDF. More details about this later.
Introduction of data about the Appointed Employee
The HR employee uses an HTML form provided by the LEAR Credential Issuer application to input the required data about the employee. The application enables also to provide such data with a YAML file, to facilitate automation of the process.
The required data includes name, surname, contact data (phone and company email), and the roles that the employee is authorised to perform. For simplicity we assume here the role onboarder, but the HR employee can specify a list of roles relevant for DOME.
Once the data is completed, the HR employee confirms the operation and the LEAR Credential Issuer notifies the Appointed Employee using the company email provided.
The Appointed employee receives the Credential Offer
The employee receives an email from the LEAR Credential Issuer with the proper instructions, including a unique transaction code that the employee requires to start the process for receiving the LEAR Credential.
The Appointed employee enters into the HTML portal provided by the LEAR Credential Issuer (the URL of the portal is well-known, but it is also described in the email).
The portal does not require the Appointed employee to be pre-registered in the application, because the unique transaction code received via email is used to access its Credential Offer.
Once the employee enters the transaction code in the portal, a QR code is displayed with the content of Credential Offer (compliant with the OpenID4VCI protocol).
The employee scans the QR code with her Wallet. She can use the Wallet provided by DOME, or any other which is compatible. This includes the possibility that the company provides employees with its own Wallet, which could even be a branded version of the DOME Wallet.
The Wallet of the Appointed employee
The Appointed employee should have a Wallet compatible with the OpenID4VCI specifications, in particular capable of the subset of functionalities specified in the DOME profile.
The employee uses the Wallet to scan the QR code presented by the LEAR Credential Issuer containing the Credential Offer. After the employee reviews the request in her Wallet and providing explicit confirmation, the Wallet generates a private/public key pair according to the did:key specification, and sends this generated did:key to the LEAR Credential Issuer following the OpenID4VCI specifications.
The LEAR Credential Issuer replies to the Wallet with an OpenID4VCI Access Token to be used later when the credential has been signed by the legal representative.
The LEAR Credential Issuer notifies via email to the legal representative (her email is pre-registered in the application, as the contact person in the organisation capable of signing the LEAR Credentials).
LEAR Credential Signer
Description
This is a simple program provided by DOME that should be installed locally in the PC of the legal representative and that performs the actual signing of the LEAR Credential (there are versions for Windows, Mac and Linux). Alternatively, any organisation can develop an equivalent program themselves if they wish, because it performs standard JAdES signatures and uses documented APIs of the LEAR Credential Issuer program.
The LEAR Credential Signer supports the following mechanisms to access the eIDAS certificate and sign the credential:
- PKCS#12 which defines a file format commonly used to store X.509 private key accompanying public key certificates, protected by symmetrical password.
- MS CAPI which is the Microsoft interface to communicate with SmartCards and Windows keyring.
- Apple Keystore allowing to access a Keychain store in a MacOS environment.
- PKCS#11 is widely used to access smart cards and HSMs in different operating systems and environments.
The functionalities of the LEAR Credential Signer are described below.
The legal representative starts the program
When the legal representative receives the email notification that a LEAR Credential needs her signature, she starts the LEAR Credential Signer program previously installed in her machine.
The program asks the legal representative for a unique transaction code received in the email. This transaction code is different from the one received by the Appointed employee, but it is related to the same transaction (the specific LEAR Credential being created).
The program invokes an API provided by the LEAR Credential Issuer to retrieve the LEAR CRedential that has to be signed. The API accepts the unique transaction code received from the legal representative.
The program displays the information for the retrieved LEAR Credential and requests confirmation to continue.
The legal representative signs the Credential
After confirmation, the LEAR Credential Signer uses the standard APIs (PKCS#12, MS CAPI, etc.) to perform the signature. During this process, the program requests from the legal representative the password or other authentication mechanism that the actual protocol requires to confirm the signature. For example, with PKCS#12 the legal representative has to provide the symmetrical password that protects the file containing the X.509 certificate.
Sending the signed credential to the LEAR Credential Signer
After the signature is performed, the program asks for another confirmation from the legal representative to continue with the process.
Then the LEAR Credential Signer program invokes another API provided by the LEAR Credential Issuer server to send the signed credential.
LEAR Issuer receives the credentials
When the Issuer receives the signed Credential from the LEAR Credential Signer, it makes the Credential available for retrieval by the Appointed employee. It also notifies via email to the involved parties (Appointed employee, legal representative and HR employee).
When the Appointed employee receives the notification, she uses her Wallet to restart the issuance process.
The Wallet uses the Access Token received in the first phase of the process to request the Credential using the OpenID4VCI protocol. After the protocol is executed, the Wallet has the LEAR Credential signed by the legal representative, ready to be used for authentication into DOME.
Verifier integration: main OIDC endpoints
Verifier integration: main OIDC endpoints
Well-known:
https://verifier.dome-marketplace.eu/.well-known/openid-configuration
Issuer:
https://verifier.dome-marketplace.eu
Token endpoint:
https://verifier.dome-marketplace.eu/oidc/token
Userinfo endpoint:
https://verifier.dome-marketplace.eu/oidc/userinfo
Introspection endpoint:
https://verifier.dome-marketplace.eu/oidc/introspect
Logout endpoint:
https://verifier.dome-marketplace.eu/oidc/logout
Verifier Integration: choosing the right integration mode
Verifier Integration: choosing the right integration mode
When integrating with the Verifier, pick the mode based on where your app runs, whether you can securely store keys, and whether a user is involved.
Quick decision checklist
-
Browser SPA / Mobile app (without a backend that can securely store keys)? → Public + PKCE
-
Backend available and you can store keys securely? → Confidential
-
No user, purely service-to-service? → M2M (client_credentials)
1) Public client — Authorization Code Flow + PKCE
Choose this if:
-
Your client runs in an environment that cannot keep secrets (SPA in the browser, mobile app, desktop app).
-
You want the simplest setup (no client keys/JWKS to manage).
What it implies:
-
Client authentication at
/oidc/token: none -
Security for the code exchange: PKCE (
code_challenge/code_verifier) -
You still use the normal user login flow:
/oidc/authorize→ (wallet presentation) →/oidc/token
Recommended when: front-end apps and “quick testing” scenarios.
2) Confidential client — Authorization Code Flow + JWT-based client authentication
Choose this if:
-
You have a backend (or a secure server-side web app) that can store keys securely (vault/HSM).
-
You want strong client authentication at the token endpoint.
-
You plan to follow the stricter profile using signed authorization requests (
request_uri).
What it implies:
-
Client authentication at
/oidc/token: JWT client assertion (e.g.,client_secret_jwtin our registrations, typically ES256 + JWKS) -
If you use
request_uriat/oidc/authorize, use adid:keyclient_id (signed request object profile). -
User login still applies:
/oidc/authorize→ (wallet presentation) →/oidc/token
Recommended when: server-side apps and partners wanting a “strongest” integration.
3) M2M (Machine-to-Machine) — Client Credentials
Choose this if:
-
There is no user interaction (background jobs, service-to-service calls).
-
You need tokens representing a machine/service identity, not a person.
What it implies:
Recommended when: backend integrations without a human login step.
Verifier Public Client Integration: Authorization Code Flow + PKCE
1. Introduction
Purpose and scope
This runbook explains how a public client, such as a web or mobile application, can integrate with the Verifier acting as an Authorization Server (AS) using the Authorization Code Flow with PKCE. It provides developers with the end-to-end steps required to obtain and use tokens securely, from initiating the authorization request to exchanging the authorization code and calling protected APIs.
Main aspects covered include:
Intended audience
High-level architecture
High-level flow
2. Integration Steps
Prerequisites
-
The legal entity has completed onboarding in the DOME ecosystem.
-
The LEAR has obtained a valid LEAR Credential through the Issuer service.
-
The end user (employee, contractor, etc.) has received a Verifiable Credential issued by the LEAR of their organization.
-
DID method supported:
did:key. -
Access to developer documentation and environment URLs (Verifier Authorization Server and APIs).
Step 1 – User credential issuance
The organization’s LEAR uses the Issuer service to issue a Verifiable Credential to the employee or user who will log in through the public client.
-
The credential is bound to the user’s DID.
-
It includes roles or permissions within the organization.
-
The credential is stored in the user’s Wallet application, which can later present it during authentication.
Outcome:
User holds a valid LEAR Credential stored in their wallet and ready to be presented during the login process.
Step 2 – Client configuration
Client type: Public (web or mobile app).
- Obtain and store the assigned
client_id,which can be a did:key or a unique identifier. - Register the
redirect_uri. -
Implement PKCE support (
code_challenge/code_verifier) to protect the authorization code exchange. -
Ensure secure handling of redirects and state parameters.
Outcome:
Public client is configured and ready to initiate the OAuth 2.1 Authorization Code Flow with PKCE.
Step 3 - Registering to the Verifier (Trusted Services List)
The relying party must be registered in the Trusted Services List. The data must match with your client's configuration (see step 2).
|
Field |
Description |
|
clientId |
Should be a did:key or a unique identifier for your client. |
|
url |
The base URL of your service or application. |
|
redirectUris |
Must include all the URLs where you expect to receive authentication responses. |
|
scopes |
Currently, only "openid_learcredential" is accepted. This scope allows your service to request the necessary credentials. |
|
clientAuthenticationMethods |
Must be set to ["none"] |
|
authorizationGrantTypes |
Must be set to ["authorization_code"] and ["refresh_token"] if needed. |
|
postLogoutRedirectUris |
Include URLs where users should be redirected after they log out from your service. |
|
requireAuthorizationConsent |
Set to false. |
|
requireProofKey |
Set to true to force PKCE. |
|
jwkSetUrl |
Leave it blank. |
|
tokenEndpointAuthenticationSigningAlgorithm |
Must be set to ES256, as this is the only supported algorithm. |
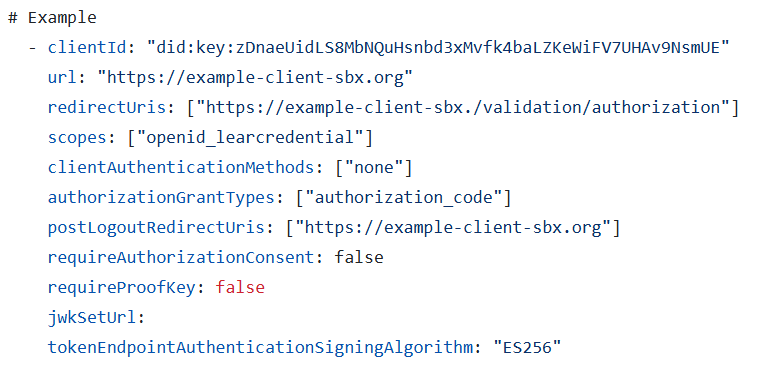
Step 4 – Authorization request
The public client initiates the authentication process by redirecting the user to the Verifier’s Authorization Endpoint, including the required parameters:
-
client_id: has to match the one in your client's configuration -
redirect_uri: has to match the one in your client's configuration -
response_type=code -
scope = openid%20learcredential(use a space between the values, not an underscore) -
state: random string -
nonce: random string (this will be added in the ID token, so it is recommended if you rely on the ID token) -
code_challenge(derived fromcode_verifier) -
code_challenge_method=S256
Non-normative example:
| GET /oidc/auth? client_id=did:key:zDnaeUidLS8MbNQuHsnbd3xMvfk4baLZKeWiFV7UHAv9NsmUE &redirect_uri=https%3A%2F%2Fapp.client.org%2F &response_type=code &scope=openid%20learcredential &nonce=1234567890abcdef1234567890abcdefXYZabc &state=1234abcd5678efgh9012ijkl3456mnop7890qrst &code_challenge=AbCdEfGhIjKlMnOpQrStUvWxYz1234567890abcdEfGhI &code_challenge_method=S256 Host: authserver.example.org |
Outcome:
User is redirected to the Verifier login screen and authenticates using their Wallet and Verifiable Credential.
Step 5 – Authorization response
After successful authentication and consent, the Authorization Server redirects the user back to the client with the authorization code and state.
Non-normative example:
| HTTP/1.1 302 Found Location: https://app.client.org/? code=A1b2C3d4E5f6G7h8I9j0K1l2M3n4O5p6Q7r8S9t0U1v2W3x4Y5z6 &state=1234abcd5678efgh9012ijkl3456mnop7890qrst |
Outcome:
The public client receives the authorization code and verifies that the returned state matches the one it initially sent.
Step 6 – Token request
The client exchanges the received authorization code for tokens by calling the Token Endpoint.
This request must include the original code_verifier used to generate the challenge.
Non-normative example:
|
POST /oauth2/token HTTP/1.1 { |
Outcome:
The Verifier validates the code and code_verifier and issues an access token and ID token.
Step 7 – Token response
Non-normative example:
|
HTTP/1.1 200 OK { |
Outcome:
-
access_tokenis used to call protected APIs on the Verifier. -
id_tokenidentifies the authenticated user. -
Tokens have a limited lifetime (typically 1 hour).
Step 7 – Use access token
The public client includes the access token in the Authorization header when calling Verifier-protected APIs:
The Verifier validates the token, checks its signature and expiration, and grants access to the requested resources.
Pitfalls to avoid
-
Mismatch between
client_idorredirect_uriin request and registration. -
Missing or incorrect
code_verifier/code_challenge. -
Using a weak or predictable
statevalue (CSRF risk). -
Reusing authorization codes.
-
Not handling token expiration and refresh flow.
-
Forgetting to set
Cache-Control: no-storein responses.
Verifier Confidential Client Integration: Authorization Code Flow + client_secret_jwt
Introduction
Purpose and scope
This runbook explains how a confidential client, such as a backend component or secure web application, can integrate with the Verifier acting as an Authorization Server (AS) using the Authorization Code Flow with client_secret_jwt client authentication. It provides a complete view of the flow — from the signed Authorization Request to token acquisition and usage — following OAuth 2.1 best practices.
Main aspects covered include:
-
Integration of confidential clients with the Verifier using Authorization Code Flow +
client_secret_jwt. -
Use of a signed JWT as the client authentication method instead of a static secret.
-
OAuth 2.1 authorization_code profile with
request_uripointing to a signed Authorization Request Object. -
Token acquisition and usage for accessing Verifier-protected APIs.
-
Security, signature validation, error handling, and observability.
Intended audience
-
Developers integrating backend or confidential clients with the Verifier.
-
Technical integrators configuring secure OAuth 2.1 clients.
-
SRE and security engineers auditing token-based authentication.
High-level architecture
-
The confidential client builds and signs an Authorization Request Object (JWT) and hosts it at a
request_uri. -
The client redirects the user to the Verifier Authorization Endpoint, including the
request_uri. -
The Verifier retrieves and validates the signed request object using the client’s public key (
jwks_uri). -
The Verifier authenticates the user and returns an authorization code.
-
The client exchanges the code for tokens using
client_secret_jwtauthentication. -
The Verifier issues access, ID, and refresh tokens.
High-level flow
-
The client creates and signs a JWT containing the Authorization Request parameters, making it available at the provided
request_uri. -
The user is redirected to the Authorization Server, which retrieves and validates the JWT.
-
After successful authentication and consent, the AS issues an authorization code.
-
The client exchanges the code for tokens, authenticating with
client_secret_jwt. -
The AS validates the JWT and issues access, ID, and refresh tokens.
-
The client uses the access token to call protected APIs, and refreshes tokens as needed.
Integration Steps
Prerequisites
-
The legal entity has completed onboarding in the DOME ecosystem.
-
The LEAR has obtained a valid LEARCredentialMachine through the Issuer service.
-
DID method supported:
did:key. -
The client’s private key is securely stored (e.g., in an HSM or vault).
-
Access to developer documentation and environment URLs.
Step 1 – Generating key pair: did:key + private key
You will need a did:key / private-key pair. It can be obtained through different methods. One option we can propose is to use our Issuer: when issuing a LEARCredentialMachine, a key pair is generated for the client. The corresponding did:key is set as the mandatee.id in the credential (which you can check in the details page after issuing it --no need to activate it). The private key must be kept securely on your side and is never shared.
Step 2 – Client configuration
Client type: Confidential.
- Obtain and store the assigned
client_id,which should be the did:key generated in the previous step. -
Ensure the
redirect_uriis pre-registered and uses HTTPS. -
Implement JWT-based client authentication (
client_secret_jwt). You client will need arequest_uriwhere a signed JWT token must be exposed (see the authorization request step).
Outcome:
The confidential client is fully configured to authenticate using signed JWTs and perform the Authorization Code Flow.
Step 3 – Registering to the Verifier (Trusted Services List)
The relying party must be registered in the Trusted Services List. The data must match with your client's configuration (see step 2).
|
Field |
Description |
|
clientId |
Should be a did:key that identifies your client. |
|
url |
The base URL of your service or application. |
|
redirectUris |
Must include all the URLs where you expect to receive authentication responses. |
|
scopes |
Currently, only "openid_learcredential" is accepted. This scope allows your service to request the necessary credentials. |
|
clientAuthenticationMethods |
Must be set to ["client_secret_jwt"] |
|
authorizationGrantTypes |
Must be set to ["authorization_code"] and ["refresh_token"] if needed. |
|
postLogoutRedirectUris |
Include URLs where users should be redirected after they log out from your service. |
|
requireAuthorizationConsent |
Set to false. |
|
requireProofKey |
Set to false. |
|
jwkSetUrl |
Since you're using a did:key for your clientId, you do not need to provide your own jwkSetUrl: the verifier can derive your JWKS directly from the did:key. Just add this string: “<verifier-url>/oidc/did/<your-did-key>”. |
|
tokenEndpointAuthenticationSigningAlgorithm |
Must be set to ES256, as this is the only supported algorithm. |
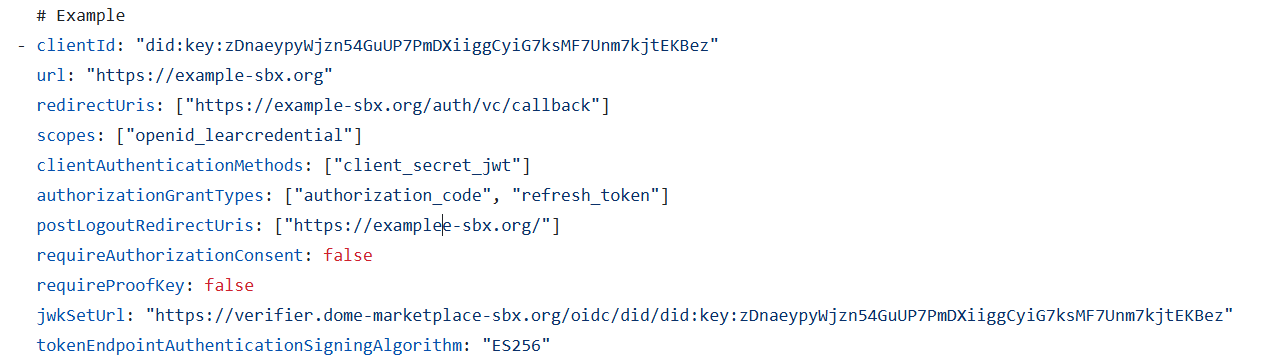
Step 4 – Authorization request
The confidential client starts the authorization process by redirecting the user to the Authorization Endpoint with these parameters :
-
client_id: has to match the one in your client's configuration -
redirect_uri: has to match the one in your client's configuration -
response_type=code scope = openid%20learcredential(use a space between the values, not an underscore)-
state: random string -
nonce: random string (this will be added in the ID token, so it is recommended if you rely on the ID token) request_uri: see the explanation below*
Non-normative example:
*The request_uri. must expose an Authorization Request Object., which is an JWT and must include these parameters. These parameters must match the ones of your client's configuration (and the ones included in the request as well):
client_idscope-
redirect_uri
Step 5 – Authorization response
After the user successfully authenticates and authorizes access, the Authorization Server redirects back to the client’s redirect_uri with an authorization code.
Non-normative example:
Step 6 – Token request
The client exchanges the authorization code for tokens by calling the Token Endpoint.
In this step, the client authenticates using client_secret_jwt, sending a signed JWT in the client_assertion parameter.
Non-normative example:
Non-normative example of a Token Request:
Step 7 – Token response
Non-normative example:
Outcome:
Step 8 – Use access token
The confidential client uses the access_token to call Verifier-protected APIs:
Verifier M2M Integration Guide
This guide describes how backend services and machine-operated components can integrate with the Verifier acting as an Authorization Server (AS) in machine-to-machine (M2M) scenarios. It specifies the end-to-end process required to obtain and use OAuth 2.1 access tokens based on the client_credentials grant, where client authentication relies on a Verifiable Presentation (VP) embedding a LEARCredentialMachine. The document explains the prerequisites, client onboarding and registration, secure handling of keys and credentials, construction of the VP and client assertion JWT, token acquisition via the Verifier Token Endpoint, and subsequent use of issued access tokens to call protected APIs. It also highlights security requirements, error handling, observability practices, and common pitfalls to ensure robust and interoperable integration across the ecosystem.
1. Introduction
Purpose and scope
This runbook explains how a backend service or component can integrate with the Verifier as an Authorization Server (AS) in M2M mode. It provides the end-to-end steps needed by developers: from preparing configuration and credentials, to calling the Token Endpoint with a LEARCredentialMachine, to using access tokens to consume protected APIs.
-
Integration of backend services with the Verifier using M2M authentication.
-
Use of LEARCredential inside a Verifiable Presentation (VP) as the client assertion.
-
OAuth 2.1 client_credentials profile with Private Key JWT.
-
Token acquisition and usage for accessing Verifier-protected resources.
-
Security, error handling, observability.
Intended audience
-
Developers building components/services in the ecosystem.
-
Technical integrators responsible for connecting a system to the Verifier.
-
SRE and security engineers validating compliance.
High‑level architecture
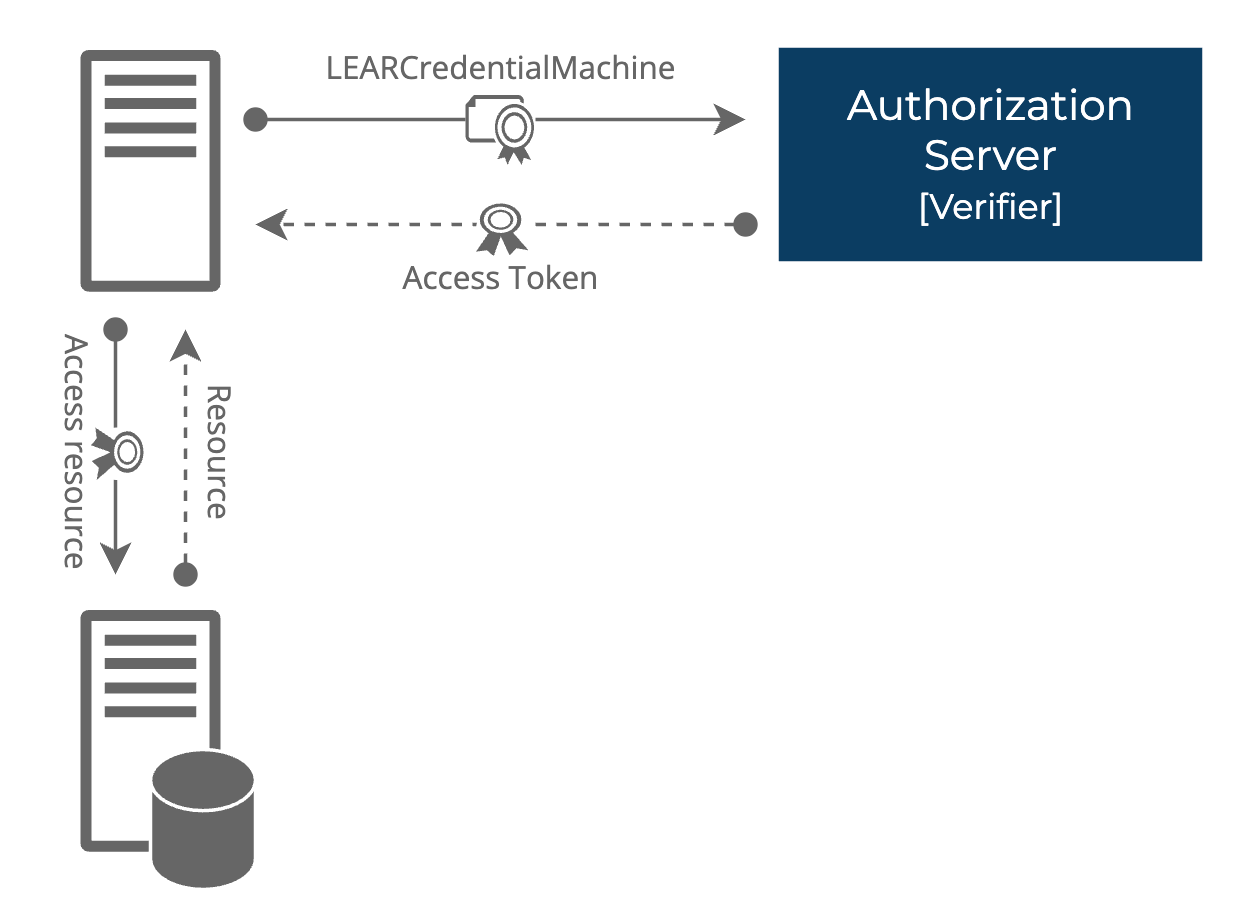
-
Client requests access token from Verifier Token Endpoint using client_credentials grant and client_assertion = VP (containing LEARCredentialMachine).
-
Verifier authenticates client, validates VP and LEARCredentialMachine.
-
Verifier issues access token with 1h lifetime.
-
Client uses access token to call protected resources.
High-level flow
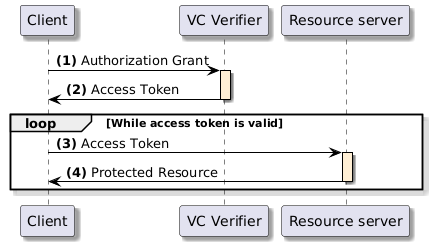
-
The client requests an access token by authenticating with the authorization server (VCVerifier) and presenting the authorization grant. Since the client authentication is used as the authorization grant, no previous authorization request is needed.
-
The authorization server authenticates the client and validates the authorization grant, and if valid, issues an access token.
-
The client requests the protected resource from the resource server and authenticates by presenting the access token.
-
The resource server validates the access token presented and if valid, returns the resource requested.
2. Integration Steps
Prerequisites
-
Legal entity has completed onboarding in the ecosystem.
-
LEAR can access the Issuer service and issue a LEARCredentialMachine to its machine(s).
-
DID method supported: did:key.
-
Access to developer documentation and test environment URLs.
Step 1 - Machine credential issuance
-
The legal entity accesses the Issuer service and issues a LEARCredentialMachine to its machine.
-
The service generates a key pair that is bound to the LEARCredentialMachine. Keep the Private Key secure.
-
The machine obtains a DID identifier. This DID will act as the client identifier. The DID is the result of using the public key of the key pair in a did:key format.
-
The LEARCredentialMachine is a JWT VC.
-
The process to obtain the LEARCredentialMachine in the LEAR wallet is similar to the other VC issuances.
Outcome: machine holds a valid LEARCredentiaMachine bound to its DID.
Step 2 - Client configuration
-
Client type: confidential.
-
Store LEARCredentialMachine and Private Key securely (Vault, HSM).
Outcome: client is ready to authenticate.
Step 3 - Acquire token
To acquire a token, the client must build a Verifiable Presentation (VP) that contains the LEARCredentialMachine (as jwt_vc_json), sign this VP as a JWT with the machine’s private key, embed it inside a client assertion JWT with the required claims, and finally POST a client_credentials request to the Verifier Token Endpoint.
Build the VP JWT (vp_token)
LEARCredentialMachine as a JWT VC string. If it is stored Base64‑encoded, decode it first.
VP object claims:
-
@context
-
type
-
verifiableCredential
Example VP object:
|
{ "@context": ["https://www.w3.org/2018/credentials/v1"], "type": ["VerifiablePresentation"], "verifiableCredential": ["eyJhb...ssw5c"] } |
VP JWT claims (signed with the machine private key):
-
iss = DID of the machine (same as ‘sub’ in LEARCredentialMachine).
-
sub = DID of the machine.
-
aud = Verifier Token Endpoint URL.
-
iat = current time (seconds).
-
nbf = same as iat.
-
exp = short expiry (e.g. iat + 10s).
-
jti = UUID (unique).
-
vp = VP object above.
Example VP JWT payload:
|
{ "iss": "did:key:zDna...", "sub": "did:key:zDna...", "jti": "urn:uuid:3978344f-8596-4c3a-a978-8fcaba3903c5", "aud": "https://verifier.dome-marketplace.eu/token", "nbf": 1541493724, "iat": 1541493724, "exp": 1573029723, "vp": { "@context": ["https://www.w3.org/2018/credentials/v1"], "type": ["VerifiablePresentation"], "verifiableCredential": ["eyJhb...ssw5c"] } } |
Build the client assertion JWT
Claims (profile):
-
iss = DID of the machine.
-
sub = DID of the machine.
-
aud = Verifier Token Endpoint URL (issuer identifier per RFC 8414).
-
jti = UUID v4 (single use).
-
iat = current time in seconds.
-
exp = iat + 10 seconds (short lifetime to prevent replay).
-
vp_token= base64url (unpadded) encoding of the VP JWT string.
Correctness rules:
-
Use NumericDate in seconds for iat/exp.
-
Use base64url per RFC 7515 for vp_token, not standard Base64.
-
Do not include presentation_submission.
-
Sign with machine private key (Header: alg = ES256 or RS256, kid = DID key).
Make the request
-
Endpoint: POST /token
-
Content-Type: application/x-www-form-urlencoded
-
Parameters:
-
grant_type=client_credentials (REQUIRED)
-
client_id=<DID or configured client id> (REQUIRED)
-
client_assertion_type=urn:ietf:params:oauth:client-assertion-type:jwt-bearer (REQUIRED)
-
client_assertion=<JWT> (REQUIRED)
|
POST /token HTTP/1.1 Host: verifier.dome-marketplace.eu Content-Type: application/x-www-form-urlencoded grant_type=client_credentials& client_assertion_type=urn%3Aietf%3Aparams%3Aoauth%3Aclient-assertion-type%3Ajwt-bearer& client_assertion=eyJhbGciOiJSUzI1NiIsImtpZCI6IjIyIn0...<snip> |
Obtain the response
If the request is valid, the Verifier issues an access token:
|
{ "access_token": "eyJraWQiOiJkaWQ6a2V5OnpEb...k9aYcDBWcGww", "token_type": "Bearer", "expires_in": 3600 } |
-
Cache-Control: no-store must be included in the response.
-
Refresh tokens are not supported.
Format of the access_token:
|
{ "kid": "did:key:zDnaekiwkWcXnHaW6au3BpmfWfrtVTJZrA3EHgLvcbm6EZnup", "typ": "JWT", "alg": "ES256" } |
|
{ "iss": "https://verifier.dome-marketplace.eu", "aud": "https://verifier.dome-marketplace.eu, "sub": "did:key:zDnaerQi587EqQLqEaj7qbxc46hzdjX2goNsmLTq1X6HqzzjP", "exp": 1745408685, "iat": 1745405085, "jti": "1700c742-5457-4c02-8e6f-020a94054519", "client_id": "https://verifier.dome-marketplace.eu" "scope": "machine learcredential", "vc": { "@context": [ "https://www.w3.org/ns/credentials/v2", "https://dome-marketplace.eu/.well-known/credentials/lear_credential_machine/w3c/v2" ], "type": [ "VerifiableCredential", "LEARCredentialMachine" ], "issuer": { "id": "did:elsi:VATES-A12345678", "organization": "TRUST SERVICES, S.L." , "country" : "ES", "commonName" : "TRUST SERVICE ELECTRONIC SEAL FOR VERIFIABLE CREDENTIALS", "serialNumber": "610dde5a0000000003" }, "credentialSubject": { "mandate": { "mandator": { "id": "did:elsi:VATFR-B12345678", "organizationIdentifier": "VATFR-B12345678", "organization": "GOOD AIR, S.L.", "country": "FR", "commonName": "JEAN MARTIN - CNI 880692310285", "serialNumber": "880692310285", "email": "jean.martin@goodair.fr" }, "mandatee": { "id": "did:key:zDnaey7ZcQ1gfXxaZSYffjvhrrFtd7PQdQtJpofzRJNCwydHL", "domain": "dpas.goodair.fr", "ipAddress": "195.70.63.244" }, "power": [{ "type": "domain", "domain": "DOME", "function": "Onboarding", "action": ["Execute"] }] } }, "validFrom": "2025-09-15T06:11:19.802230162Z", "validUntil": "2026-09-15T06:11:19.802230162Z", "credentialStatus": { "id": "https://issuer.dome-marketplace.eu/credentials/status/1#urn:uuid:68422e47-5d69-4e0b-8a49-34990f2f76a, "type": "PlainListEntity", "statusPurpose": "revocation", "statusListIndex": "urn:uuid:68422e47-5d69-4e0b-8a49-34990f2f76a2", "statusListCredential": "https://issuer.dome-marketplace.eu/credentials/status/1" } } } |
Pitfalls to avoid
-
Milliseconds vs seconds in time claims.
-
Using Base64 instead of Base64URL.
-
Wrong iss/sub values (must be DID).
-
VP with more than one LEARCredentialMachine.
-
Replay attacks: enforce unique ‘jti’ within the expiration window.